What is an implanted port?
An implanted port is a device placed under the skin, usually on the upper chest, for accessing a vein. The port makes it easier to give IV medicines or fluids and take blood samples. Depending on the type of port the child has inserted, a separate IV may be needed if the doctor orders radiographic studies with contrast.
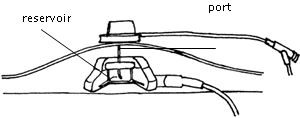
The implanted port has 2 parts: the catheter and the reservoir. The catheter is a long, hollow tube inserted into a large vein that goes to the heart. The reservoir is the part that is accessed (a needle is put into it) for treatments.

How should the child be prepared?
Use simple words to explain why the port is needed and what to expect. How much detail you give will depend on the age of the child, and the degree of anxiety about the procedure. If you need help, ask a social worker or consultant.
Explain procedures before they are done, especially what the child will see, hear, and feel. Tell the child what is expected ahead of time, such as, “Your job is to hold still while I flush the port.” This will help make care easier for both of you.
How is the port put in?
During surgery, the surgeon inserts the tip of the catheter under the chest skin and tunnels it into the superior vena cava, a large vein that goes to the heart. The reservoir is placed under the skin.
There will be two small incisions on the chest after surgery, one at the base of the neck where the catheter was inserted into the vein, and one where the reservoir was placed under the skin.
There will be a coin-sized bump under the skin where the implanted port is. Your child may have soreness or discomfort at the incision sites. Pain medicine will be given by mouth as needed.
How is the port used?
Caring for a child with an implanted port may be a little scary at first. Nurses and medical officers will take care of the port and give the medicines while your child is in the hospital. They will flush the port to help prevent blood from clotting and blocking it. If it becomes blocked, it may have to be removed.
How often the port needs to be flushed depends on whether a constant infusion is being given. The child needs the port flushed at least once a month but also after any infusions. At time of discharge the port will be flushed and the needle removed while in clinic/hospital.
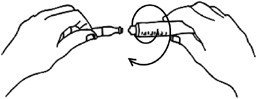
Only non-coring needles are used with the implanted port. These are special needles that do not leave a hole in the reservoir of the port (see picture below). This allows the port to be accessed many times without damage.
Always use 10-ml or larger syringes. A smaller syringe may push too much pressure into the catheter and cause it to burst. Also make sure syringes do not have an air bubble in them. Every time the port is flushed with normal saline or heparin, use the “push-and-pause” method: push a little solution, then pause for 1 to 2 seconds, then push a little more, pause, and so on. This method cleans the inside of the catheter.
Applying anesthetic cream
If using anesthetic cream (such as EMLA® or Prilox®) to reduce the discomfort of the needle, this needs to be applied at least 1 to 2 hours before accessing the port to numb the skin. It should not be rubbed in and after placing a blob on the area of the port it should be covered with a non-absorbent dressing. To find the area to apply it, feel for the edges of the port with your fingers.
Preventing infection
Implanted ports are helpful for taking care of children requiring chemotherapy; however, they can increase the risk of infections when bacteria grow in the device and travel to the bloodstream. This is called a Central Line Associated Blood Stream Infection or CLABSI. A CLABSI can be serious and life threatening. Fortunately there are steps we can take to prevent CLABSIs. The most important step is hand washing.
At the hospital
Cleanliness is a must! Each time the port is flushed, these steps should be followed:
- Prepare a clean work area by cleaning a surface and lay a clean towel on it.
- Wash hands well, using an alcohol hand sanitizer according to directions. If hands are dirty, wash with soap for at least 15 seconds, use a paper towel or clean hand towel to dry.
- Before each time you flush or put any medicine into the IV tubing, scrub the injection cap for 30 seconds with a chlorhexidine wipe, using friction and let the cap dry. Do not blow on it.
Parents and patients also have a role to play in preventing CLABSIs:
- Wash hands with soap and water, or use alcohol-based hand rub found in each room. Hand hygiene is required:
- When you enter and leave your child’s room;
- Before and after you prepare food, eat, or feed your child;
- Before and after you use the bathroom or change a diaper.
- Ask your child’s visitors to wash their hands when they enter and exit your child’s room.
- Do not allow visitors to touch the IV tubing.
- Watch your nurses and doctors to make sure they wash their hands before and after handling IV tubing. Do not be afraid to remind them to wash their hands!
- Keep any IV tubing out of the diaper area when changing the diaper, and do not allow your child to suck on tubing.
Cleaning up
Put the needle and the tubing into the sharps container. Put used syringes into the hazardous waste container, especially if they are soiled with blood.